Main Menu

Main menu bar is located on top of timemaker window by default. You can use it to control most of the features that TimeMaker software offers. In this guide we will show you some of these options and provide you links to advanced guides.

In Main Menu bar you can:
create items
switch modules
access the E-mail menu
setup user configuration
get help
and more!

Click on “i” icon on specific Main Menu category to get detailed information on its options.

Or, you can click on following categories, coresponding with these in TimeMaker software:

File – control system related operations, such as: going offline.
Create – create an email or Production Item.
Go – switch to various TM Modules.
View – control the way the TM is presented.
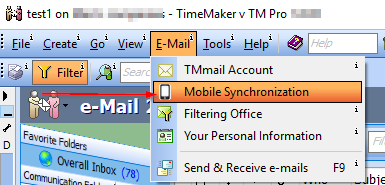
E-Mail – set the processes for the sending and receiving of e-mail messages
Tools – set the TM according to your needs. The system administrator will have more rights than a TM User.
Help – obtain online support, read the manual, and access the TM BLOG.
Show Video view videos which explain the most important TM actions you can perform.

Delivery of sent emails (anti SPAM solution)

As we live in the age of SPAM, we should care about our “anti spam email-score”.
Due to email-score, the SPAM filters and servers decide to pass sent email into recipient inbox, to the SPAM folder or it will be not delivered at all.

This guide is for the Advanced users! If you are not sure, what are you doing, please contact support@timemaker.org to help you.

You can check your score for example here:
www.mail-tester.com – send the email to the shown email address and click check score.

Here is a few steps how to improve your email score:

1) SPF record
Sender Policy Framework is an email authentication method designed to detect forging sender addresses during the delivery of the email.
If you wish to know your SPF record, please contact the support@timemaker.org;
This will help your associated email domain name to pass to the recepient address through SPF check.

2) Content of the email
Please be aware, that a lot of html, inserted images and URLs might be considered as SPAM by SpamAssasin.
Always try to have better plain text ratio.

3) No Broken links
Please make sure, that all links inside your email are working.

4) SPAM black lists
Your email address should not be blacklisted at any of the known SPAM lists. You can check it via www.mail-tester.com  .

If your email is still considered as SPAM, please contact TimeMaker support at support@timemaker.org . We will solve the situation with you.


Language install

Hello,

In this guide we will show you how to install additional language to Timemaker software.

You can install these languages:
English (default)
Hebrew
Spanish
German
Mongolian
Czech
Slovak

1) First of all, you have to once run Timemaker as administrator. You can do it by right clicking on Timemaker icon and select Run as administrator

2) after timemaker opens, click on TM installer field, in bottom of Timemaker

3) now, choose localization you want to install and click Next

4) another window will open, click on Download button, to start downloading and installing the language

5) after installation is complete, new instance of Timemaker will open and you can select language of your choice here:’

If you have any issues installing language, please contact live support.

Mobile Setup – Android

In the Android cellphone you can use many of third-party applications for e-mail. For example Outlook mobile, AquaMail, Newton Mail, TypeApp, etc.
This guide will not describe settings in the concrete application. Please use help of your used application for access to the e-mail account settings.

The details which you need for the Android mail applications can be found inside the TimeMaker menu:  E-Mail -> Mobile Synchronisation

Details for the Android email applications can be found inside the TimeMaker and they will look like this:

Server can often be reffered in the android devices as the “host name”
We use ports:
143 for IMAP (incoming emails)
587 for SMTP (outgoing emails)
We don´t support SSL.

Please, always use IMAP for the mobile synchronization. You can read about IMAP vs POP3 here. 

Don´t forget – password for mobile synchronization is different then login password to the TimeMaker. 

Mobile Synchronization

Please note. 

When you do mobile synchronization for a first time, you must change password for the mobile synchronization which is different then your TimeMaker Login password! This can be done inside of TimeMaker in the menu E-Mail –> Mobile Synchronization.

Example of the password change at the screenshot:

fastmail.com

1) Go to the fastmail.com and log-in

2) At the top-left corner press button “Settings”

3) At the menu at the left side find the “Rules” and click button “Create Rule”

4) Click the line “From email address” and select “all” from the displayed dropdown menu.

5) Select checkbox “Send a Copy” and write down your TimeMaker address to the “To:” field.
Guide how to find your TimeMaker address can be found here.  

6) Press button “Save”

centrum.cz

1) Přihlašte se do Vašeho emailu na cetrum.cz

2) Stiskněte “nastavení” v pravém horním rohu

3) Stiskněte tlačítko “Personalisace” a rozbalte kartu “Filtry”

4) V kartě “Filtry” nastavte pole “podmínka” na volbu “Všechny zprávy” a zaškrtněte pole “pošli kopii na adresu”  jako na obrázku níže.
V poli “pošli kopii na adresu” zadejte Vaši TimeMaker adresu.
Jak zjistit Vaši TimeMaker adresu naleznete zde.

5) Stiskněte tlačítko “vytvořit”

zoho.com

1) Go to the zoho.com and log-in your e-mail.

2) Go to the Settings (Top-right corner) 

3) In the Settings select “E-mail forwarding”

4) Fill in your TimeMaker e-mail
How to find your TimeMaker e-mail address is described here.  

5) Check your TimeMaker for the confirmation code and copy it.

6) Enter the Verification code into ZohoMail and press “Verify”

7) Done
More informations how to forward into Zoho can be found here.

yandex.com

1) Log-in into yandex.com e-mail

2) Press “settings button” at the top right corner and select “Message Filtering” as at the image:

3) Press “Create Filter” as at the image

4) At the filter setup page, please leave all fields blank and check box “Forward to” and check box “save copy”
Fill your TimeMaker address into field “Forward to” .
How to find your TimeMaker address is described here.
Then press “Create Filter”. You will be prompted for the password.

Screenshot for reference:

5) Done